Let me cut through the noise for you. If you’ve just deleted photos or videos on your Samsung Galaxy S25, whether by accident, habit, or sheer frustration, you’re probably sifting through dozens of cookie-cutter articles telling you to “check your Trash” or “use Google Photos.” And sure, those tips work… sometimes. But what about when they don’t? What if you’re past the 30-day trash window? Or what if your cloud sync wasn’t even turned on to begin with?
This is where experience kicks in, and where I come in.
I’ve been elbows-deep in Samsung systems for over a decade. I don’t just read spec sheets, I troubleshoot devices for a living, dig into firmware, and recover data in situations most users would’ve written off as lost forever. The Galaxy S25, with all its power and polish, still plays by the same digital rules as every other device: data isn’t really gone until it’s overwritten.
In this guide, I’m not going to hand you surface-level solutions. I’m walking you through real, field-tested recovery methods, from native tools to advanced software, based on what actually works in the wild. Whether you’re dealing with accidental deletion or a full data wipe, I’m going to help you get your photos and videos back like a pro.
Ready to dive deeper than the average tech blog? Let’s begin.
Know How Deletion Works on the Galaxy S25
Before we talk about recovery, we need to understand what “deletion” actually means on the S25. Most people assume that when they delete a file, it’s gone forever. But here’s the truth: it’s not. Not immediately.
Samsung’s One UI (especially in the Galaxy S25) is smart enough to give you a buffer, a safety net, if you will. When you delete a photo or video from the Gallery, it doesn’t vanish. It gets moved to a hidden holding area called Trash, where it sits quietly for 30 days before being permanently erased.
But here’s where it gets interesting: even after the 30-day period, the data isn’t technically destroyed. Unless something new gets written over the same storage space, there’s still a window for recovery. That’s why acting fast, and smart, is critical.
Technician’s Insight: I’ve restored data from devices that had their trash emptied, screens cracked, and system updates mid-way. But timing? That’s your best friend in recovery.
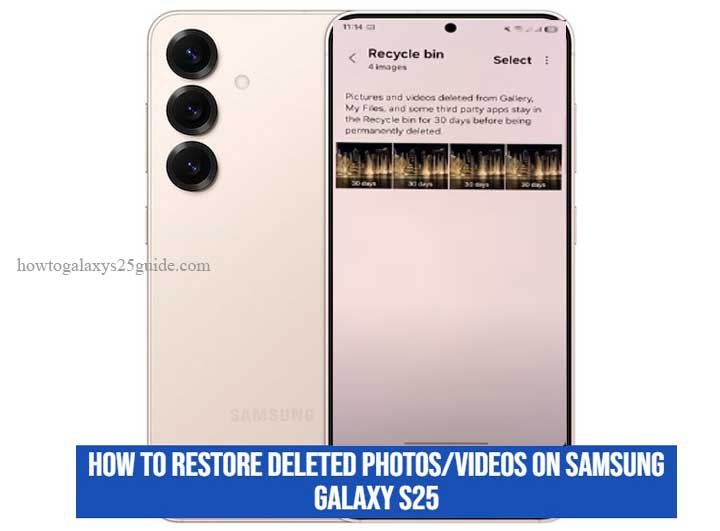
1. Restore from Samsung Gallery Trash
Let me walk you through something that seems simple on the surface, but most users either overlook it or misunderstand how it actually works.
The Samsung Gallery Trash isn’t just a bin. It’s a controlled buffer zone. Think of it as a digital airlock, your deleted photos and videos don’t get destroyed right away; they’re just moved out of sight, kept in a holding cell for 30 days. Why? Because Samsung knows we’re human. We tap the wrong thing, swipe too fast, or clean up in a hurry. That grace period? It’s your second chance.
Now, here’s how to use it like a technician would:
Step-by-Step: Accessing and Restoring from Trash
- Open your Gallery app.
- Tap the Menu (three horizontal lines) in the bottom-right corner.
- Select Trash (you might see it labeled as “Recycle Bin” depending on your One UI version).
- Browse the list of deleted items, everything here is sorted by deletion date.
- Tap Edit, select the items you want to recover, and then hit Restore.
Simple? Yes. But here’s what most guides won’t tell you.
2. Restore from Samsung Cloud (If Backup Was Enabled)
Now let’s talk about Samsung Cloud, a feature many users ignore, underestimate, or flat-out forget exists… until they need it most.
Here’s the thing: if you had Gallery Sync turned on, even once, there’s a good chance your deleted photos or videos are still floating up there, untouched, waiting to be pulled back down to earth. Unlike Trash, Samsung Cloud isn’t working on a 30-day countdown. If your files were backed up before deletion, you’ve got a lifeline, and it doesn’t expire as quickly.
How to Check for Recoverable Media in Samsung Cloud
- Open Settings on your Galaxy S25.
- Tap your Samsung account name at the very top.
- Go to Samsung Cloud > Restore data.
- Select your previous device (yes, even older devices if you upgraded).
- Choose Gallery or specific categories like Photos or Videos.
- Tap Restore and let the magic happen.
3. Recover via Google Photos (If Synced)
Now we’re diving into the Google Photos play, which, believe it or not, is the hidden ace up the sleeve for most Galaxy S25 users. Why? Because this app often runs in the background, quietly syncing your memories even when you’re not paying attention. And that’s exactly what makes it so powerful.
If you had Google Photos set to Back up & sync, your deleted media might still be available, even if it’s long gone from the Samsung Gallery or even the device storage itself.
Steps to Check and Restore via Google Photos:
- Open the Google Photos app.
- Tap collection> Tap Trash.
- Browse the deleted items, Google holds them for 60 days (double what Samsung’s Trash offers).
- Select the files you want to recover.
- Tap Restore, the photos/videos will return to your Google Photos library and also back to the original device folder if synced.
Important Notes:
- You must be signed in to the same Google account you used for backup.
- If Back up & sync wasn’t turned on, this method won’t work. But don’t sweat it, we’ve still got cards to play.
Google Photos is like that technician assistant you didn’t know you had. It works silently, but it can come through in the clutch, especially when Samsung’s built-in tools don’t have your back.
4. Employ a Trusted Android Data Recovery Tool
Alright, let’s get one thing clear, if you’ve already checked Samsung Gallery Trash, Samsung Cloud, Google Photos, and even Smart Switch, and you still haven’t recovered what you need, you’re officially in deep waters. But don’t panic. This is where professional-grade tools step into the spotlight.
These aren’t your run-of-the-mill apps. I’m talking about dedicated Android data recovery software, the kind real technicians keep in their back pocket when the built-in options fall short.
What Is an Android Data Recovery Tool?
It’s a piece of software, installed on a PC or Mac, that deep-scans your Galaxy S25’s internal memory or SD card (if you use one). It doesn’t care whether you deleted something yesterday or three months ago. As long as the data blocks haven’t been overwritten, these tools can resurrect photos, videos, and more.
Think of them like digital forensics teams. They don’t just look at what’s visible, they dig into what’s left behind.
Technician’s Go-To Tools:
- Dr.Fone – Data Recovery (Wondershare)
- Tenorshare UltData for Android
- iMobie PhoneRescue
- FonePaw Android Data Recovery
Each has its strengths, but they all work on a similar principle: connect the device, scan for lost files, preview, and restore. Most are plug-and-play, though you’ll need to enable USB debugging and possibly root access for deeper scans. Turn Camera Flash ON/OFF on Samsung Galaxy S25
Final Words from the Technician’s Desk
Let me level with you.
I’ve spent more late nights in front of disassembled phones and corrupted memory modules than I care to count. I’ve seen panic in the eyes of people who thought their baby’s first steps, wedding clips, or once-in-a-lifetime vacation shots were gone forever. And more often than not? We got those memories back. Why? Because data loss isn’t the end, it’s just another technical problem waiting for the right solution.
If you’re using a Samsung Galaxy S25, you’re holding one of the most intelligent pieces of hardware Samsung has ever released. It’s packed with fail-safes, sync layers, redundancy options, and cloud integrations that work hard behind the scenes. Your job? Learn how to harness them before disaster strikes, and know how to respond after it does.
The key is this: Don’t panic. Work the checklist.
- Trash > Cloud > Google Photos > Professional Recovery Tools.
- That’s your sequence. That’s your toolkit.
Technician’s Final Tip:
Make backup a habit, not a reaction. Turn on Gallery Sync, link Google Photos, and for critical files, keep a local copy and a cloud one. You wouldn’t drive a car without insurance, right? Don’t treat your data any differently.
And if you ever find yourself staring at an empty album with your heart in your throat, just remember, there’s always a way back. You just need the right know-how… or someone like me on your side.
From one tech-savvy warrior to another:
- Keep your software updated, your backups frequent, and your curiosity sharp. That’s how you master your Galaxy, not just use it.
See you on the next troubleshooting journey.
From the technician’s desk, with a soldering iron in one hand and a recovery cable in the other.