When you’ve spent enough time under the hood of Samsung devices, tearing them down, configuring firmware, testing features across One UI updates, you start to appreciate the finer details. One of those subtle yet incredibly powerful tools is location tagging in photos. It’s not just a GPS pin on a picture; it’s context. It’s memory with coordinates. It’s technical elegance baked into something as simple as snapping a shot.
With the Samsung Galaxy S25, things have gotten smarter, faster, and frankly, a bit more layered. Samsung has fine-tuned the camera experience on this model to the point where even background features like geotagging deserve a second look. But here’s the thing: if you’re not enabling it properly, or if the right permissions aren’t dialed in, your photos might as well be floating in digital space with no anchor.
This guide isn’t your average walk-through. I’m not just handing you steps, I’m walking you through the right way to set up location tagging on your Galaxy S25, with technician-grade insight. Whether you’re an enthusiast, a content creator, or just someone who appreciates knowing exactly where that perfect sunset was shot, this is the setup you’ll want to follow.
Let’s get into the mechanics.
What Is Photo Location Tagging?
Photo location tagging, or “geotagging” if you prefer the proper term, is the quiet feature doing some heavy lifting behind the scenes. It’s what embeds latitude and longitude data into your image file the moment you press the shutter button, no fuss, no extra steps, just clean metadata tucked inside every photo.
But let’s peel that back a little.
When location tagging is enabled on your Galaxy S25, the camera doesn’t just capture the image, it captures where that image was taken. That means a photo snapped at the base of a mountain trail carries the GPS signature of that exact spot.
Open it in your gallery later, and boom, your device can place it on a map, group it by location, or even help you retrace your steps. This is the kind of functionality most users overlook, but as someone who’s calibrated dozens of Samsung cameras across models and One UI generations, I can tell you: it’s one of the smartest things you can activate.
Now here’s the technician’s reality check: this data is embedded using the phone’s GPS sensors, and the accuracy depends on how well your device locks onto a signal at the moment of capture. Indoors, you’ll get a vague pin. Outdoors? You could mark the exact bench you sat on. The Galaxy S25 does a solid job with this thanks to enhanced GNSS support, but only if the system is set up correctly, which we’ll get into next.
In short, location tagging turns your photo library into a digital atlas, and if you value order, memory accuracy, or just knowing exactly where you were when the light hit just right, this feature isn’t optional. It’s essential.
Step-by-Step Guide: How to Add Location to Photos on Samsung Galaxy S25
Let’s get into the meat of it. This isn’t some generic checklist, it’s a refined workflow built on experience with Samsung’s system architecture, One UI nuances, and real-world performance. If you’re using the Galaxy S25 and want your photos to carry accurate, embedded location data, here’s how to do it, the right way.
Step 1: Open the Camera App — But Don’t Snap Yet
Launch the Camera app from your home screen or app drawer. You might be tempted to dive straight into shooting, but hang tight, location tagging isn’t something you want to assume is active out of the box. Samsung gives you the tools, but it’s your job to activate them with intention.
Step 2: Tap the Gear Icon (Camera Settings)
In the viewfinder interface, look for the gear-shaped icon, typically usually located inside a square dot icon., depending on your layout preferences.
Tap it. Welcome to the Camera Settings, where the real control lives. From here, you’re not just tweaking filters, you’re configuring the backbone of your image capture environment.
Step 3: Find and Enable “Location Tags”
Scroll down and look for “Location tags” or “Save location” — Samsung has labeled it slightly differently depending on your software version, but it’s there.
Toggle the switch ON. This is what tells your Galaxy S25 to attach GPS data to every image going forward.
Pro Tip: If your device asks for permission to access location while using the camera, grant it. Without this, tagging won’t work no matter how many switches you flip.
Step 4: Confirm GPS Is Active and Accurate
Now, here’s where most guides stop, but this is where experience kicks in.
Swipe down from the top of the screen and long-press the Location icon. Make sure your Location services are turned ON, and switch the accuracy mode to “Precise” (you’ll see it labeled as “Improve accuracy” or similar).
Samsung’s S25 uses enhanced GNSS support (GPS, GLONASS, Galileo), and enabling precision mode ensures you’re tagging the correct place, not just somewhere in the city block.
Step 5: Test It — And Check the Metadata
Snap a quick photo. Now open it in the Gallery app, tap the three-dot menu in the lower corner, and select “Details.”
If everything’s set up correctly, you’ll see the location coordinates or map view embedded. That means the system’s working, and your photos are now location-aware.
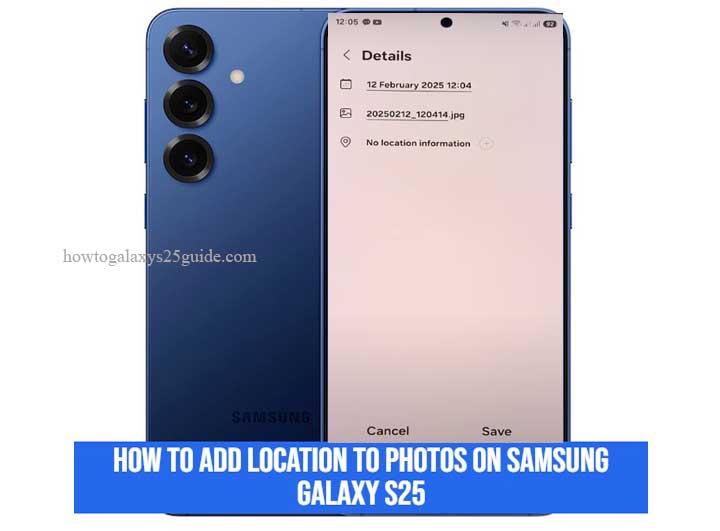
If you haven’t enabled the location tag feature before and the photo has already been taken, you can add it manually, here are the steps:
- Open the gallery app and tap the photo you want to add location info to.
- Tap the three-dot icon, usually located in the top right corner.
- Then tap Details.
- Tap Edit.
- Tap add location information by tapping the + icon.
- Done.
Note from the field: If you don’t see location info, don’t panic. Give the GPS a few seconds to lock, especially indoors. Go outside and try again for a stronger signal.
That’s it, not just how to add location tags, but how to ensure they’re embedded properly and reliably. You’re not just flipping a setting; you’re optimizing one of the Galaxy S25’s most underrated tools. Enable / Disable Double Tap To Turn Off Screen on Galaxy S25
Final Thoughts
Here’s the truth most casual users miss: location tagging isn’t just about remembering where you were, it’s about creating data-rich photos that work smarter across your digital ecosystem. With the Samsung Galaxy S25, you’re not just holding a camera in your hand; you’re holding a precision instrument loaded with tools that, if configured properly, will elevate every image you capture.
As someone who’s spent years in the guts of Samsung firmware, testing updates before they reach consumer hands, I’ll say this plainly: when it comes to geotagging, it’s the setup, not the feature itself, that determines your experience. When all the switches are aligned, camera settings, permissions, location accuracy, what you get is seamless, invisible functionality that just works.
But remember: these tools are only as good as how you use them. You now know how to activate location tagging, how to verify it, and how to make it precise. That’s more than most. And if you’ve followed these steps like a technician would, carefully, intentionally, methodically, your Galaxy S25 is now doing something smarter behind the lens every time you take a shot.
In a world drowning in digital photos, having ones that know where they were taken? That’s not just smart, that’s next-level.
Now go out there, shoot intentionally, and let your photos carry more than just pixels. Let them carry a sense of place.