Let’s get one thing straight—anyone can take a screenshot. But taking a clean, clutter-free screenshot on the Samsung Galaxy S25? That’s a technician’s craft. Most people never even scratch the surface of what their Galaxy device can do. They fumble around with power buttons or live with notification icons and status bars photobombing their screen captures. Me? I don’t do messy screenshots. I do precision.
See, the Galaxy S25 isn’t just a smartphone—it’s a powerhouse built with layers of intelligence, if you know where to look. And that’s the difference. While the average user’s poking through general settings hoping to stumble across something useful, I’m diving straight into the Advanced Settings menu—where Samsung tucks away the features designed for users who know their tools.
Today, I’m going to show you how to hide the status and navigation bars when capturing screenshots on the Galaxy S25. Not using third-party apps. Not with complicated ADB commands. I’m talking about doing it the way Samsung intended—clean, native, and efficient.
If you’re a developer, a content creator, or just someone who takes pride in what their screenshots look like, this guide’s for you. So roll up your sleeves—we’re going into the deep settings, where the real power lives.
Why You’d Want to Hide Status and Navigation Bars
Let me put it plainly—when you’re serious about your screenshots, the clutter has to go.
I’ve worked on Samsung devices since the Galaxy S2, and one thing I’ve seen time and time again is how most users don’t realize the impact of the status and navigation bars until they start using screenshots professionally. You might not notice it at first—Wi-Fi icons, battery percentages, carrier logos, little clock digits ticking away in the corner. But trust me: those fragments cheapen your screenshots. They distract. They leak information. They scream “amateur.”
Whether you’re building an app portfolio, creating a training manual, demoing a UI to a client, or posting clean visuals on social media, clean is king. You want the content—your content—to be the only thing people see. No clock. No signal strength. No leftover notifications. And certainly no navigation indicators floating at the bottom of the screen.
And let’s not ignore the privacy side of this. Your status bar is a snitch. Think about it: time, battery, missed calls, VPN keys, Do Not Disturb icons—all quietly exposing personal usage data in every screenshot. I’ve seen devs accidentally post screenshots with confidential test environments showing in the status bar. A small detail, but it only takes one slip.
And then there’s the visual symmetry. When you hide both bars, you get full-frame captures that align edge-to-edge—no UI bleed, no uneven margins. It’s exactly what designers crave and documentation teams demand.
The truth is, hiding those bars isn’t just a preference—it’s a discipline. It means you know your tools. It shows you’re not just using a Galaxy S25—you’re commanding it.
So while others are busy cropping screenshots after the fact, you’ll already have it right from the source. That’s not just efficient—it’s professional. And it’s exactly what the Galaxy S25 was built to do… if you know where to look.
Step-by-Step Guide: Hiding Status and Navigation Bars
Here’s where we stop playing tourist and get our hands into the wiring. If you want screenshots that look like they came out of a developer preview — not a group chat — you’ll need to get comfortable with Samsung’s Advanced Settings menu. This isn’t a hidden trick. It’s just buried deep enough that most people never touch it.
So let’s walk through it like a pro, step by step — no fluff, no guesswork.
Step 1: Get Into the Engine Room (Settings Menu)
Start by unlocking your Galaxy S25. Now tap into the Settings app — not from a search bar, not from a shortcut. Go in clean. That’s how you train your fingers to know the layout, just like I do when testing dozens of units a week.
Step 2: Scroll Down to “Advanced Features”
Once you’re inside, scroll until you see Advanced Features. This is where Samsung parks the tools they don’t expect average users to touch — but you’re not average, are you?
- Tap Advanced Features like you own the place.
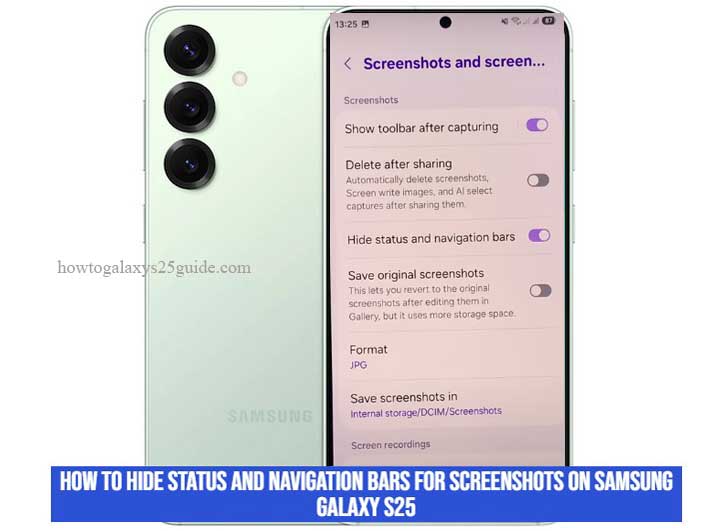
Step 3: Enter “Screenshots and Screen Recorder”
Now find the option labeled “Screenshots and Screen Recorder.” It won’t jump out at you. It’s quiet, like all the best tools. Open it.
Inside, this is where you’ll find the switches most people never touch. This section isn’t about fun — it’s about control.
Step 4: Toggle Off the Noise
Here’s the gold:
- Hide Status Bar and Navigation Bars > Turn this on. This strips out the top bar — no clock, no notifications, no carrier info. Just clean pixels.
- Whether you’re using buttons or gesture navigation, this wipes the lower edge clean for every capture.
Now, if you’re thinking, “What if I still want to see them during normal use?” — relax. These toggles only affect screenshots, not your live display.
Optional Pro Move: Add Screenshot Delay
Still in the same menu? Good.
Turn on “Screenshot Delay.” This gives you a 1–3 second buffer before the capture fires. That way, you can swipe a banner out of the way, or land exactly where you want before the shot hits.
It’s one of those small touches that separates a technician’s screenshot from a casual user’s.
That’s It — Now Take the Shot
You’re now set up. Take a screenshot using your preferred method:
- Power + Volume Down (classic)
- Palm Swipe (toggle it in Motions and Gestures)
- Edge Panel Screenshot Button (if enabled)
- Every shot will come out clean. No UI trash. Just signal-free, edge-to-edge perfection.
When I set up client devices or prep Galaxy units for demos and screen-recording sessions, this is one of the first settings I lock in. Why? Because once you taste clean screenshots, you never go back.
This isn’t a trick. It’s standard procedure — when you know what you’re doing.
Conclusion
Now you know. Not the gimmick way, not the workaround — the right way.
Most folks tap around the surface of their devices, never digging deeper than a few swipes and a YouTube tip. But the Galaxy S25? It wasn’t built for surface skimming. It was built for command. And once you’ve stepped into the Advanced Settings menu and toggled off the clutter — status bar gone, navigation bar erased — you’re not just using the phone. You’re operating it.
This method isn’t flashy. It doesn’t scream for attention. But it’s clean. Controlled. Surgical. And in my field — whether I’m preparing demo units for Samsung labs, testing pre-release firmware, or configuring a content creator’s daily driver — clean and controlled always wins.
Remember this: a screenshot should say exactly what you want, nothing more. No battery percentages leaking into the corner. No stray notifications whispering your personal life into the margins. Just raw, clean output — the way a professional sets it up.
So next time someone asks how your screenshots look so sharp, so empty, so intentional — don’t just say “settings.” Tell them you tuned it. Tell them you cleaned the HUD. Tell them you did it like a technician.
Because when you work with Samsung hardware the way I do, you don’t settle for what’s visible. You go after what’s possible.