Samsung’s latest flagship, the Galaxy S25, brings advanced features, faster performance, and seamless connectivity to users worldwide. Before enjoying all these capabilities, one essential step is inserting a SIM card correctly.
A Subscriber Identity Module (SIM) card is vital for enabling mobile connectivity, authenticating your identity with the carrier, and providing access to calls, texts, and mobile data. While it may seem like a small task, improper installation can cause connection problems or even hardware issues.
Research from Stanford University (2022) shows that correct handling of hardware components—even tiny ones like SIM cards—helps reduce physical stress on circuits and prolongs device lifespan. That’s why following the right procedure matters.
This article explains step by step how to insert a SIM card on the Samsung Galaxy S25, highlights common mistakes to avoid, and provides troubleshooting tips backed by expert insights.
Why Proper SIM Card Installation Matters
A SIM card acts as the secure identifier that links your smartphone to your mobile carrier. Without it, the Galaxy S25 cannot access 4G or 5G networks, send text messages, or make calls.
Incorrect installation can lead to:
- No service or network errors.
- Unrecognized SIM card due to poor contact.
- Physical damage to the tray or connectors.
The University of Cambridge’s Department of Engineering emphasizes that reliable electrical contact between SIM pins and internal connectors is crucial for stable communication. This highlights why proper insertion is more than just a formality.
Tools and Preparations Before You Begin
Before inserting the SIM card, make sure you have:
- SIM ejector tool (included in the box). A paperclip can work as an alternative.
- Nano SIM card: The Galaxy S25 only accepts this format.
- Powered-off device: Prevents glitches and reduces risk of electrical discharge.
- Clean environment: Keep dust and moisture away to ensure smooth insertion.
Step-by-Step Guide: How to Insert SIM Card on Samsung Galaxy S25
Step 1: Power Off the Device
Hold down the power button and tap Power Off. This ensures the system initializes the SIM safely once restarted.
Step 2: Locate the SIM Tray
On the Galaxy S25, the SIM tray is placed along the upper side frame. You’ll see a small pinhole next to it—this is where the ejector tool goes.
Tip: Because the phone is sealed with water-resistant materials, apply gentle pressure to avoid damaging the tray or waterproofing.
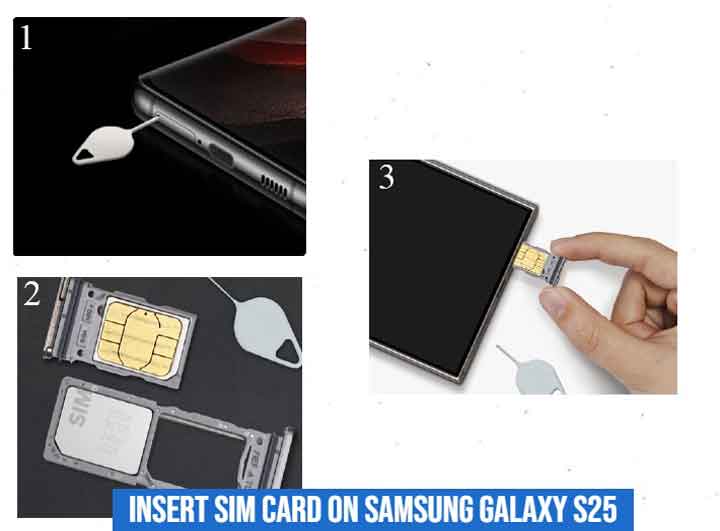
Step 3: Insert the SIM Ejector Tool
Insert the ejector tool into the pinhole and push lightly until the tray pops out. Avoid excessive force.
Step 4: Place the SIM Card Correctly
- Keep the gold contacts facing downward.
- Align the notched corner with the tray.
- Lay it flat and snug inside the slot.
Step 5: Reinsert the Tray Securely
Push the tray back until it sits flush with the device frame. It should slide in smoothly if aligned properly.
Step 6: Power On and Verify
Restart your phone and wait a few seconds. The carrier’s name and signal bars should appear at the top of the screen. If they do, your SIM card is working correctly.
Common Mistakes to Avoid
Even simple steps can go wrong if not done carefully. Some frequent mistakes include:
- Forcing the tray into place, which may bend or break connectors.
- Using the wrong SIM size instead of requesting the correct Nano SIM.
- Inserting while powered on, which increases the chance of hardware stress.
Research from MIT’s Department of Electrical Engineering confirms that inserting components into powered devices raises electrostatic discharge risks, which can damage sensitive circuits.
Troubleshooting SIM Card Issues on Galaxy S25
If your SIM card doesn’t work after insertion, try the following fixes:
1. No SIM detected
- Remove the tray, clean the SIM’s gold contacts with a microfiber cloth, and reinsert.
2. Weak or no signal
- Check whether your carrier supports the Galaxy S25’s frequency bands.
- Reset network settings: Settings > General Management > Reset > Reset Network Settings.
3. SIM locked
- Some SIMs are network-locked. Contact your carrier for an unlock code.
4. Damaged SIM tray
- If bent or broken, visit an authorized Samsung service center for replacement.
Tips for Dual SIM Users (If Supported)
Certain Galaxy S25 models support dual SIM functionality. If yours does, here are some ways to use it effectively:
- Assign one SIM for calls and another for mobile data.
- Separate personal and business lines.
- Switch carriers to maximize coverage while traveling.
- Manage preferences in Settings > Connections > SIM card manager.
Conclusion
Learning how to insert a SIM card on the Samsung Galaxy S25 is simple, but doing it correctly ensures reliable network access and prevents hardware problems. By shutting down the device, using the proper tool, aligning the SIM carefully, and reinserting the tray gently, you protect both your card and your phone.
The University of Oxford’s Department of Engineering Science notes that precise handling of microelectronics significantly lowers the risk of long-term malfunctions. Taking a few extra seconds to follow best practices not only safeguards your Galaxy S25 but also guarantees stable connectivity for everyday use.
Whether you are setting up the phone for the first time or switching carriers, these steps provide a safe, effective way to insert your SIM card and get connected without issues.
FAQ
1. What SIM card does Samsung Galaxy S25 use?
The Galaxy S25 uses a Nano SIM card, which is the smallest SIM format available today.
2. Can I insert the SIM card while the phone is on?
It’s not recommended. Always power off your Galaxy S25 before inserting or removing the SIM card to avoid glitches or potential hardware risks.
3. Where is the SIM card slot located on the Galaxy S25?
The SIM tray is located on the upper side frame of the device. You’ll see a small pinhole beside it for the ejector tool.
4. Does the Galaxy S25 support dual SIM?
Yes, certain models support dual SIM functionality, allowing you to use two numbers on the same device.