After working on Samsung devices for over a decade, from cracking open the early Galaxy S models to fine-tuning the latest S25 Ultra, I’ve come to appreciate just how far these phones have evolved. The Galaxy S25 isn’t just another flagship, it’s a precision tool, packed with AI-driven features that most users barely scratch the surface of. One standout capability? Removing photo backgrounds with surgical accuracy, no clunky apps, no external software, just pure Samsung engineering at work.
Now, if you’re someone who thinks background removal is best left to designers with Photoshop on a desktop, I get it. But trust me: Samsung has built this feature so tightly into One UI, it’s practically effortless, and the results are cleaner than what I’ve seen from many third-party tools.
In this guide, I’ll walk you through exactly how to remove photo backgrounds on your Galaxy S25 using native tools, the way a technician would do it: fast, precise, and without cutting corners.
Understanding Samsung’s Native Background Removal Tools
Most people don’t realize it, but starting with the Galaxy S24 and now perfected in the S25 series, Samsung has quietly baked in some of the most advanced AI photo tools in the mobile industry. While other brands shout about “smart features,” Samsung just gets to work, and this is a perfect example.
The background remover on the Galaxy S25 doesn’t require any special downloads or paid upgrades. It’s integrated directly into the Gallery app and leverages Samsung’s proprietary AI segmentation engine, powered by the same on-device neural processing unit (NPU) that handles advanced tasks like live translation and scene recognition. That means it’s fast, private, and doesn’t rely on cloud processing to get the job done.
Whether you’re cleaning up a product photo, isolating a subject for a presentation, or just making memes with a clean cut-out of your dog, Samsung’s tool is up for it. And the best part? You can do it in under ten seconds with just your fingers. Let me show you how.
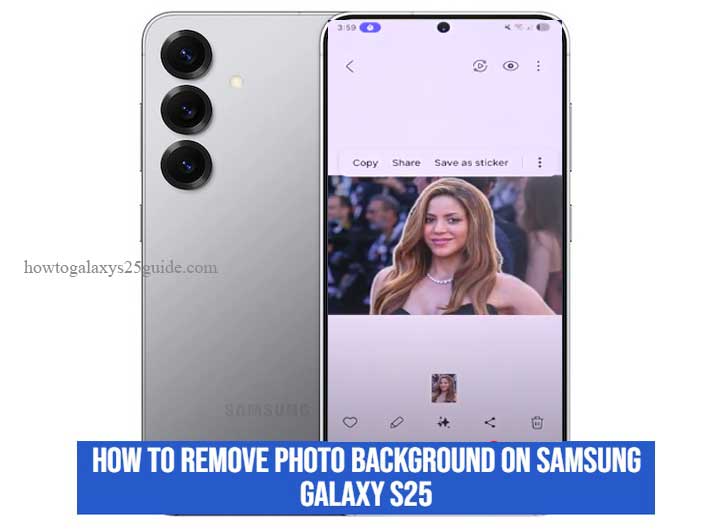
Method 1: Using the Tap-and-Hold AI Cutout Feature in the Gallery
This is Samsung’s most user-friendly approach, and it’s surprisingly accurate, even by technician standards.
Here’s how to do it:
- Open the Gallery app and choose any photo with a clear subject.
- Tap and hold on the main subject, your face, a pet, or any object you want to isolate.
- You’ll feel a light vibration and see a glowing outline. That’s Samsung’s AI doing its thing.
- Once it locks in, you’ll get a menu with two options: Copy or Save as Image.
- Tap Save as Image to create a new file with the background removed.
Pro Technician Tip:
This works best on photos with good contrast between the subject and background. If it’s too busy or low-light, the AI might get confused. Try enhancing the image in the Photo Editor first for best results.
Method 2: Removing Backgrounds Manually with Object Eraser
Now, for those of you who prefer a bit more control, or when the AI cutout just doesn’t get it quite right, Samsung gives you another tool: the Object Eraser. This one’s a bit more hands-on but offers incredible precision once you know how to use it like a pro.
Here’s how to access it:
- Open your photo in the Gallery app.
- Tap Edit (the pencil icon at the bottom).
- Tap the More options menu (Tap the four-dot icon on the far right of the editing options.).
- Select Object Eraser.
From here, you can manually highlight parts of the background you want removed. Samsung’s AI will attempt to fill in the gap using contextual information from the surrounding area, similar to content-aware fill in desktop software.
This is especially useful when:
- The subject and background are similar in color and the AI can’t auto-detect.
- You want to remove a specific object (like a photobomber or clutter in the background).
- You’re dealing with complex edges, hair, fur, or transparent items.
Technician’s Insight:
Object Eraser isn’t just a gimmick. I’ve used it in real-world situations to clean up client product photos and promotional material, right from the phone. It’s not just for social media. With a little patience, it rivals desktop tools.
Saving and Exporting Your Background-Free Image
Once the background is removed, either automatically or manually, the next step is knowing where your image goes and how you can use it.
If you use the tap-and-hold method:
- The new image is saved directly to your Gallery as a PNG (with transparent background).
- You can find it under the Recent tab or inside the Pictures album.
- If you use Object Eraser:
- The changes are saved to a copy of the original photo (Samsung never overwrites your original unless you tell it to).
You can now:
- Drag your cutout into other photo editing apps.
- Use it for presentations, WhatsApp stickers, custom thumbnails, social posts, or even digital signatures.
Pro-Level Tip:
If you’re serious about design work, pair your cutouts with Samsung Notes or Good Lock’s Wonderland module for animated stickers and interactive wallpapers. Use Two WhatsApp Accounts on Galaxy S25
Conclusion
At this point, you’ve seen exactly what the Galaxy S25 is capable of, and we’ve only scratched the surface of its photo-editing arsenal. Background removal on this device isn’t just a novelty or a quick social media trick. It’s a fully integrated feature designed with real-world utility in mind, fine-tuned by engineers who understand what users and professionals alike actually need.
From automatic AI cutouts to precise manual edits with Object Eraser, Samsung has delivered tools that rival desktop software, right in your pocket. And I say that not as someone casually reviewing phones, but as a technician who’s been elbows-deep in Galaxy internals and firmware for years. When I tell you this phone can handle serious editing tasks without breaking a sweat, I mean it.
So whether you’re isolating product shots, customizing thumbnails, or just having fun cutting out your dog’s head for a sticker, remember: the Galaxy S25 isn’t just smart, it’s built for people who expect more. And if you’ve made it this far, I’m guessing you’re one of them.